![[ Swingley Development ]](../images/title.png)
![[ Jump to Content ]](../images/blank_white.png)
Krenov-style Shelves (page 2 of 3)
Here's some photos of me building my Krenov-style shelves. The most recent of these images were taken on the 23rd of October, 2000. Thanks to my wife Andrea for taking such good photos of me at work.
Other Woodworking pages:
| Projects | Plans | Tools | OldTools Archive |
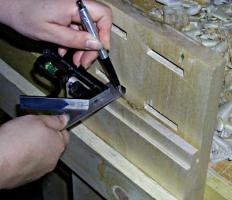 Now that I've
finished the mortises and have smoothed the faces of the side
boards, it's time to mark and cut the tenons on the ends of the
back support and the two shelves. The photo on the right shows how
I (although the hands in the photograph are actually my wife's)
mark the tops of the tenons on one of the shelves -- clamp the
side piece and the shelf together, and draw a line along a ruler
stuck through the mortise.
Now that I've
finished the mortises and have smoothed the faces of the side
boards, it's time to mark and cut the tenons on the ends of the
back support and the two shelves. The photo on the right shows how
I (although the hands in the photograph are actually my wife's)
mark the tops of the tenons on one of the shelves -- clamp the
side piece and the shelf together, and draw a line along a ruler
stuck through the mortise.
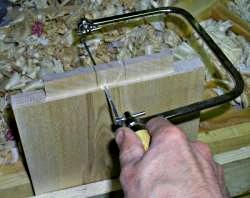 I cut the tenons
themselves with my tablesaw, using a Delta tenoning jig to make
the cheek cuts, and a dovetail saw to make the shoulder cuts. The
material between the mortises is removed using a coping saw.
I cut the tenons
themselves with my tablesaw, using a Delta tenoning jig to make
the cheek cuts, and a dovetail saw to make the shoulder cuts. The
material between the mortises is removed using a coping saw.
I intentionally leave the tenon slightly too large so I can make fine adjustments with a chisel, and my "new" Stanley 60 1/2.
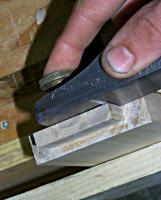 After getting the top of the
tenon to fit snugly into the mortise, the lower end of the tenon is
cleaned up with a shoulder plane. The blade on the shoulder plane
goes all the way to the edges of the plane, so I can cut right
into the corner of the tenon, something a 60 1/2 can't do. The block
plane does clean up the rest of the cheeks, though.
After getting the top of the
tenon to fit snugly into the mortise, the lower end of the tenon is
cleaned up with a shoulder plane. The blade on the shoulder plane
goes all the way to the edges of the plane, so I can cut right
into the corner of the tenon, something a 60 1/2 can't do. The block
plane does clean up the rest of the cheeks, though.
 Next I marked the curves for the front edge of the side pieces
(using a large mixing bowl) and rough cut the curve with a coping
saw. The cut came out really rough, so I smoothed the curve
using a spokeshave with a rounded sole.
Next I marked the curves for the front edge of the side pieces
(using a large mixing bowl) and rough cut the curve with a coping
saw. The cut came out really rough, so I smoothed the curve
using a spokeshave with a rounded sole.
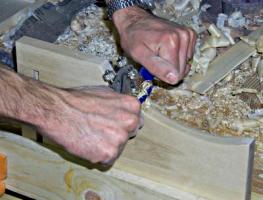
All the edges are chamfered using a block plane as shown on the right. I decided to also chamfer the ends of the cross pieces rather than stop the chamfer where cross pieces mate. Not only is it easier this way, but the chamfer will serve to hide places where the shoulder of the tenon doesn't match the mortised piece exactly.
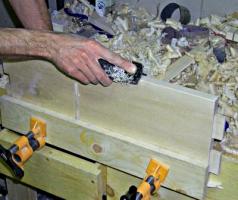 In the
picture to the right you can also see the slot mortise I cut in the
shelf for the cross piece that seperates the drawer box from the
lower shelf. I cut this using the same methods detailed earlier,
except the mortise is only about 3/8 of an inch deep. Since it
isn't really a structural member, fitting the tenons into these
mortises isn't critical.
In the
picture to the right you can also see the slot mortise I cut in the
shelf for the cross piece that seperates the drawer box from the
lower shelf. I cut this using the same methods detailed earlier,
except the mortise is only about 3/8 of an inch deep. Since it
isn't really a structural member, fitting the tenons into these
mortises isn't critical.