![[ Swingley Development ]](../images/title.png)
![[ Jump to Content ]](../images/blank_white.png)
Magazine Cabinet (page 2 of 2)
Here's my progress and some current photos of my magazine cabinet. The most recent of these images were taken on the 31st of March, 2001.
Other Woodworking pages:
| Projects | Plans | Tools | OldTools Archive |
 Now that we've finished cutting the joints for the main carcase,
we can start forming the joints that will hold the other pieces into
the case. The first joint to form is the female half of the sliding
dovetail joint that will securely hold the middle shelf in position.
Now that we've finished cutting the joints for the main carcase,
we can start forming the joints that will hold the other pieces into
the case. The first joint to form is the female half of the sliding
dovetail joint that will securely hold the middle shelf in position.
I chose a sliding dovetail joint because it serves to pull the sides together, and I was concerned that the middle shelf might bow enough that it could come out of a normal dado. An alternative might be to use a wedged mortise and tenon joint, either with through mortises, or using fox mortises. A sliding dovetail is easier and probably more secure.
 My sliding dovetail is stopped so it won't show through to the
front of the cabinet, and it is tapered to make it easier to assemble.
To start, mark the top side of the shelf on the inside face of the
side, and then mark the taper of the dovetailed side. The taper
should be such that at the back the bottom of the dovetail is no
wider than the thickness of the shelf board, and is still large enough
at the front that no strength is compromised. Strike these lines with
a marking knife.
My sliding dovetail is stopped so it won't show through to the
front of the cabinet, and it is tapered to make it easier to assemble.
To start, mark the top side of the shelf on the inside face of the
side, and then mark the taper of the dovetailed side. The taper
should be such that at the back the bottom of the dovetail is no
wider than the thickness of the shelf board, and is still large enough
at the front that no strength is compromised. Strike these lines with
a marking knife.
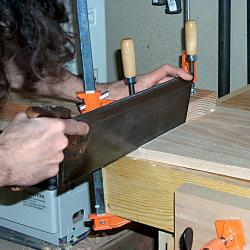
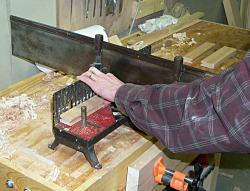
 Next, chisel out a space at the front of the joint at least
an inch long. This will be the space that the saw will run
into while cutting the remainder of the slot. To actually cut
the sides of the slot, place a batten against the struck lines,
and use the batten to guide the saw. In the picture above you
can see the chiseled space that the saw slides into. The bottom
side of the dovetail slot should be cut at an angle (I used 9
degrees off perpendicular). You can also dovetail the top edge,
but I left this side at 90 degrees.
Next, chisel out a space at the front of the joint at least
an inch long. This will be the space that the saw will run
into while cutting the remainder of the slot. To actually cut
the sides of the slot, place a batten against the struck lines,
and use the batten to guide the saw. In the picture above you
can see the chiseled space that the saw slides into. The bottom
side of the dovetail slot should be cut at an angle (I used 9
degrees off perpendicular). You can also dovetail the top edge,
but I left this side at 90 degrees.
Once you've sawed down to the depth desired, chisel out most of the waste, and finish the bottom of the groove with a router plane. If the saw cuts are uneven or rough, clean them up with a side rabbet plane (#79 or a #98 / #99 pair). You can also use a side rabbet to increase or decrease the dovetail angle as you try to get the shelf to match.
 Creating the dovetailed ends on the shelves themselves starts
by marking the depth of the groove on the ends of the shelf. Next,
cut out the material from the front corner of each side of the shelf
so the shelf will fit into the stopped groove. I used a dovetail
saw to cut down to the scribed line, a coping saw to remove most of
the waste, and then chiseled the remainder down to the lines.
Creating the dovetailed ends on the shelves themselves starts
by marking the depth of the groove on the ends of the shelf. Next,
cut out the material from the front corner of each side of the shelf
so the shelf will fit into the stopped groove. I used a dovetail
saw to cut down to the scribed line, a coping saw to remove most of
the waste, and then chiseled the remainder down to the lines.
I cut a very shallow rabbet on the top side of the ends of the shelf to hide the top of the groove. It's much easier to make this rabbet smooth, straight, and sharply defined than it is to keep the dado in good condition.
 After cutting this rabbet, carefully transfer the taper of the
top of the dovetail to the shelves. These marks will indicate the
depth to cut along the scribed lines. I made this cut the same
way I did it earlier using a batten and a back saw.
After cutting this rabbet, carefully transfer the taper of the
top of the dovetail to the shelves. These marks will indicate the
depth to cut along the scribed lines. I made this cut the same
way I did it earlier using a batten and a back saw.
Once the deepest part of the tapered dovetail has been defined, chisel away some of the material at the correct angle. A guide block may help keep the chisel oriented correctly. A side rabbet plane is an excellent tool for cleaning up the dovetail until it fits smoothly into it's housing.
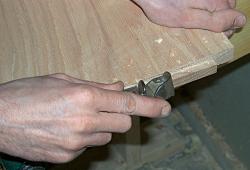
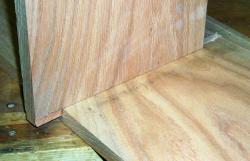
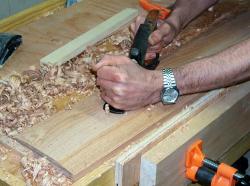
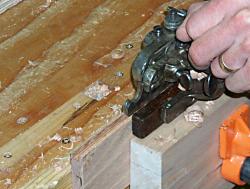
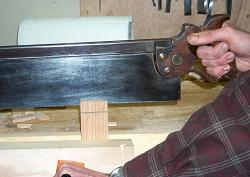
 In the pictures above you can see me trimming the dovetail
with my side rabbet plane (a Stanley #79), and then testing
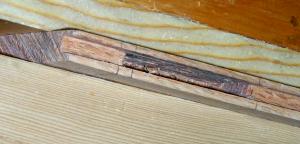
the fit of the shelf with the side of the case. At the back
of the shelf you can see the shallow rabbet on the top side
of the shelf and the dovetail profile on the bottom. The
dark marks on the side are from my router plane and will be
planed / scraped off before the final assembly.
In the pictures above you can see me trimming the dovetail
with my side rabbet plane (a Stanley #79), and then testing
the fit of the shelf with the side of the case. At the back
of the shelf you can see the shallow rabbet on the top side
of the shelf and the dovetail profile on the bottom. The
dark marks on the side are from my router plane and will be
planed / scraped off before the final assembly.
 Next, we need to form the dado that run around the back edges
of the carcase. This could very easily be done using a plow plane
or it's iron equivalent, except that the dado can only run to the
end of the boards in certain directions. For example, along the
sides, the dado can run out the bottom of the side, but it can't
be cut all the way to the top because it would show through at
the top of the case (depending on where the dovetails are cut).
The dado in the bottom piece is even more difficult because the
dado can't run out on either side.
Next, we need to form the dado that run around the back edges
of the carcase. This could very easily be done using a plow plane
or it's iron equivalent, except that the dado can only run to the
end of the boards in certain directions. For example, along the
sides, the dado can run out the bottom of the side, but it can't
be cut all the way to the top because it would show through at
the top of the case (depending on where the dovetails are cut).
The dado in the bottom piece is even more difficult because the
dado can't run out on either side.
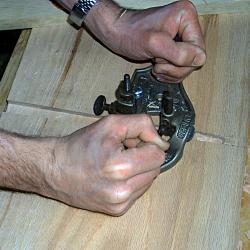
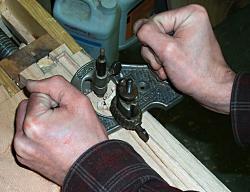
 I used a Stanley #45 combination plane to cut the majority
of the dado. To clean up the rest of the dado, and to insure
the dado is flat bottomed and evenly cut, I chiseled out most
of the waste at the very top of the stopped portion, and then
cleaned it up using a router plane (a Stanley #71). When using
the router plane you need to be careful to watch the orientation
of the blade so it doesn't cut into the sides of the dado.
I used a Stanley #45 combination plane to cut the majority
of the dado. To clean up the rest of the dado, and to insure
the dado is flat bottomed and evenly cut, I chiseled out most
of the waste at the very top of the stopped portion, and then
cleaned it up using a router plane (a Stanley #71). When using
the router plane you need to be careful to watch the orientation
of the blade so it doesn't cut into the sides of the dado.
After chopping the small mortises in the sides for the French cleat, we can begin forming the back assembly.
 The first step in making the back assembly is to reduce the
thickness of the 4/4 lumber to 1/2 inch thick boards. I used a #40
scrub plane to remove most of the waste, by hogging the wood along
the edges down to the lines I marked, and then removing most of the
wood in the middle. To get the board flat, I used a Marsh #5 1/2,
the wooden jack plane I made, and finally a smoothing plane.
The first step in making the back assembly is to reduce the
thickness of the 4/4 lumber to 1/2 inch thick boards. I used a #40
scrub plane to remove most of the waste, by hogging the wood along
the edges down to the lines I marked, and then removing most of the
wood in the middle. To get the board flat, I used a Marsh #5 1/2,
the wooden jack plane I made, and finally a smoothing plane.
Putting the groove along the insides of the pieces was done with my #45 combination plane. At this stage, the rails and stiles are all longer than their final dimension. This allows some leeway in case the grooving breaks out the sides at one end, and will also help when pounding out the mortises in the stiles.
Once the grooves have been cut, form mortises in stiles where the rails will go. I used a breast drill with a 1/4 inch bit to remove most of the waste, and finished the mortises with a pair of chisels.
 Tenons are formed on the ends of the rails by cutting the shoulders
with a back saw, chiseling away most of the cheeks, and finishing the
cheeks and shoulders with a block plane (#60 1/2) and a shoulder plane
(#92). The haunches on the top and bottom rails was cut with a dovetail
saw. Once the rails and stiles fit together properly, trim the stiles
to length.
Tenons are formed on the ends of the rails by cutting the shoulders
with a back saw, chiseling away most of the cheeks, and finishing the
cheeks and shoulders with a block plane (#60 1/2) and a shoulder plane
(#92). The haunches on the top and bottom rails was cut with a dovetail
saw. Once the rails and stiles fit together properly, trim the stiles
to length.
The panels for the back assembly are made by reducing the thickness of the 4/4 red oak to 1/2" thick using the methods introduced earlier (scrub plane, jointer plane, jack, smoother). A rabbet is cut all the way around both sides (using a #78) to form a 1/4" thick, 1/2" wide tongue that will fit into the grooves in the rails and stiles. Be sure to leave some room for expansion and contraction in the panels by leaving some space between the tongues and the bottom of the grooves.
 For example, the widest panel is 10 1/2", and my shop is
currently at approximately 8% moisture content. If I know the
maximum moisture content in my area is 11%, I calculate that
the panel will expand by approximately 1/8". So if I have 1/16"
clearance between the tongue and the bottom of the groove in the
top and bottom rail, I've got plenty of room for the maximum
expansion the cabinet is likely to experience. The panel can
also shrink by an equal amount (moisture content of less than 5%)
without exposing the end of the tongue.
For example, the widest panel is 10 1/2", and my shop is
currently at approximately 8% moisture content. If I know the
maximum moisture content in my area is 11%, I calculate that
the panel will expand by approximately 1/8". So if I have 1/16"
clearance between the tongue and the bottom of the groove in the
top and bottom rail, I've got plenty of room for the maximum
expansion the cabinet is likely to experience. The panel can
also shrink by an equal amount (moisture content of less than 5%)
without exposing the end of the tongue.
The doors are formed using frame and panel techniques similar to those used on the back assembly. The rails and styles are ripped, jointed, smoothed and grooved as was done earlier.
The tenons on the ends of the rails were cut using a miter box and a backsaw. The miter box saw depth is set to the depth of the groove in order to form the shoulder cuts (the tenon is the same thickness as the groove cut in the rails and stiles). This way the cuts are perfectly square and are the correct depth. The cheek cuts were made using my "Disston tenoning jig," as shown above. The tenons are cleaned up using a shoulder plane.
 While making the door frames, it's time to get started on the
finish for the project. The panels for the back assembly need to
be finished first so the tongue can get the correct coloration
-- if this is done after assembly, shrinkage in the panel would
expose un-stained wood.
While making the door frames, it's time to get started on the
finish for the project. The panels for the back assembly need to
be finished first so the tongue can get the correct coloration
-- if this is done after assembly, shrinkage in the panel would
expose un-stained wood.
I chose a mission oak style finish based on an article at Jeff Jewitt's web site. It'll take several days to complete the finish for each part, so it's better to get going as soon as individual pieces are completed. Be sure to tape off joints that will require glue so the finish doesn't inhibit a proper glue bond. On this project, this isn't critical except for the tenons on the door rails because the construction techniques used in the carcase are very strong even without glue.
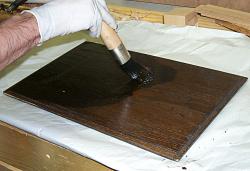 Start by pre-raising the grain with a wet sponge. After the
wood dries (overnight), lightly sand down the grain with 220 or
320 grit sandpaper. Next, apply a dark, water-based dye stain.
I used Homestead Finishing's Dark Mission Oak TransTint powder
dye, dissolved in water, and applied with a rag. After liberally
applying stain to the wood, wipe away any excess and let the wood
dry for a few hours. Lightly sand the risen grain, and re-apply
the stain.
Start by pre-raising the grain with a wet sponge. After the
wood dries (overnight), lightly sand down the grain with 220 or
320 grit sandpaper. Next, apply a dark, water-based dye stain.
I used Homestead Finishing's Dark Mission Oak TransTint powder
dye, dissolved in water, and applied with a rag. After liberally
applying stain to the wood, wipe away any excess and let the wood
dry for a few hours. Lightly sand the risen grain, and re-apply
the stain.
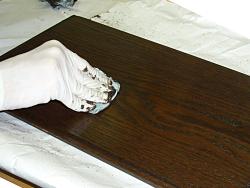 After 24 hours, the stain should have dried completely, and
the wood should be smooth. Seal the dye stain using two coats of
2# shellac. I used Paddy's
SuperBlonde dewaxed shellac, but you could change the color
slightly using a darker shellac like orange or garnet. You can
see this step in the picture above.
After 24 hours, the stain should have dried completely, and
the wood should be smooth. Seal the dye stain using two coats of
2# shellac. I used Paddy's
SuperBlonde dewaxed shellac, but you could change the color
slightly using a darker shellac like orange or garnet. You can
see this step in the picture above.
Once the shellac dries, use a stiff bristle brush to work a dark gel stain into the pores of the wood. I used Varathane Dark Walnut gel stain. Before the stain dries, wipe it off the surface of the wood with a dry rag. This should leave stain in the pores, but the remainder of the wood will be the same color as the original dye stain.
 After the gel stain dries, a couple coats of shellac, followed by
some paste wax will finish the job.
After the gel stain dries, a couple coats of shellac, followed by
some paste wax will finish the job.
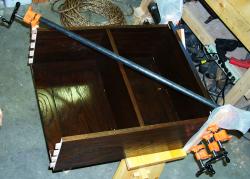
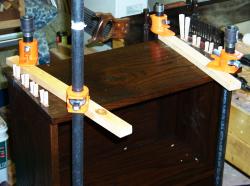
After completing the finish on all the carcase parts, we're ready to glue up the case. I used a liquid hide glue because it cleans up with water and because it has a much longer open time than a typical white or yellow glue. First, assemble the top to one of the sides and insert the french cleat tenon into the mortise on the back of case. Next, slip the other side into the dovetails on the top, and seat the other french cleat tenon. When all the pieces are fitted properly, draw the sides together. I used waxed paper between the cauls and the top of the case so any glue that leaks out won't glue the caul to the case.
 The middle shelf will help hold the sides together, so drive
the shelf into the sliding dovetail slot in the case. Finally,
insert the back assembly into the dados in the back of the case.
I used glue on the dovetails at the top of the carcase and
put a little glue on the shelf, but the rest of the assembly was
dry. After measuring the diagonals, use a diagonal clamp to hold
the case square until the glue dries.
The middle shelf will help hold the sides together, so drive
the shelf into the sliding dovetail slot in the case. Finally,
insert the back assembly into the dados in the back of the case.
I used glue on the dovetails at the top of the carcase and
put a little glue on the shelf, but the rest of the assembly was
dry. After measuring the diagonals, use a diagonal clamp to hold
the case square until the glue dries.
After the first glue up dries, fit the tenons at the bottom of the sides into the bottom mortises and drive the wedges into the slots to expand the tenons into the angled mortises. I clamped the bottom to the rest of the case before hammering the wedges so they will force the bottom flush with the case.